My 'Idler' broke! Well... I broke it! I applied too much pressure to it and 'snap' went the hinge. See photo:
 In recent times the extruder was performing poorly. The flow was struggling and weak. The hobbed bold seemed to struggle to feed filament also. You could hear the filament chipping. It wasn't good. I couldn't figure what was going wrong, and was suspecting a jam somewhere towards the hot-end. The nozzle temperature was reaching it's, by now, usual 185Deg C, and I hadn't changed any settings in recent times, for a change! So, in a moment of frustration I over tightened the springs on the idler, and that broke the hinge.
It was one of the first parts I had ever printed, some months ago, and wasn't of great quality really looking at it now, but would have lasted quite well if I hadn't been so impatient with my troubleshooting. But with it now broken I was faced with a dilemma since I hadn't a spare one. How could I print a new one? But in addition, what was the problem with the extruder, as that would have to be solved before any more printing could resume.
 Getting over the broked Idler was easy, if a little temporary. I glued the broken Idler back together and crossed my fingers it would hold until I got a new one printed. And, might aswell use a RepRapped clamp, something I had print earlier!
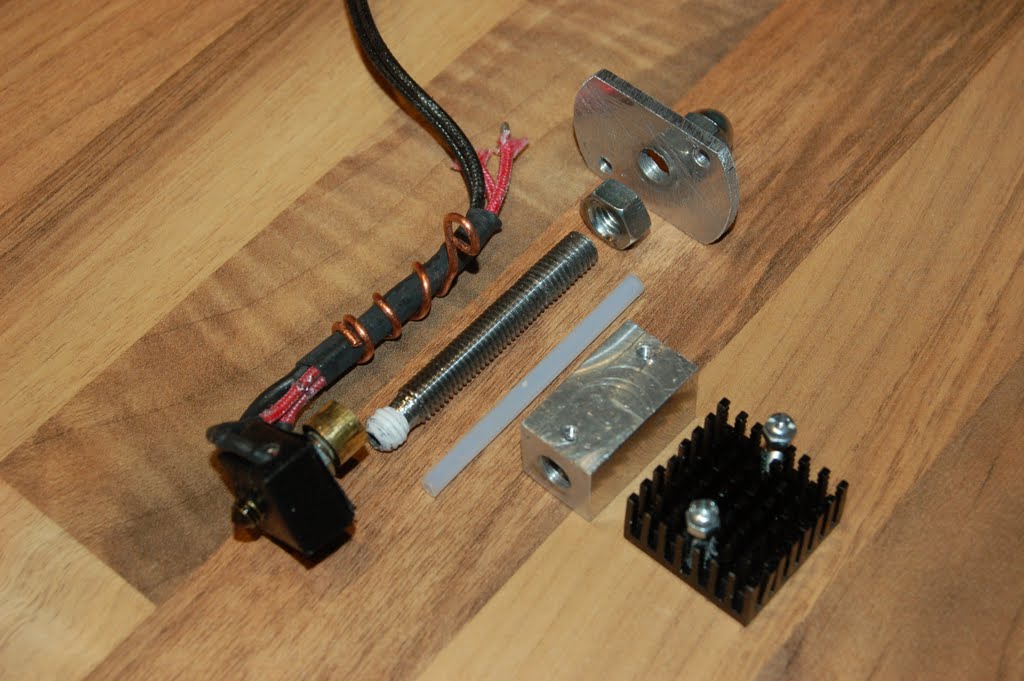
But what was wrong with the extruder? With a calmer troubleshooting approach now under way I soon diagnosed that the filament wouldn't feed by hand at all. I took the extruder apart, unscrewing the stainless tube from the brass one and removing the PTFE liner. There were no leaks evident, no blockages aparent. It was a puzzle. I reassembled the hotend and clamped it in a vice, plugged it in and brought it up to 185Deg. The filament would feed smoothly by hand as far as the start of the heater, but no further. With nothing visibly wrong I could only conclude things just weren't hot enough. I increased the temperature in steps of 5Deg C, and things began to flow again. When I reached 200Deg things began to flow smoothly again, with hand fed pressure. I took it to 210Deg and it began to blob and crackle (too hot).
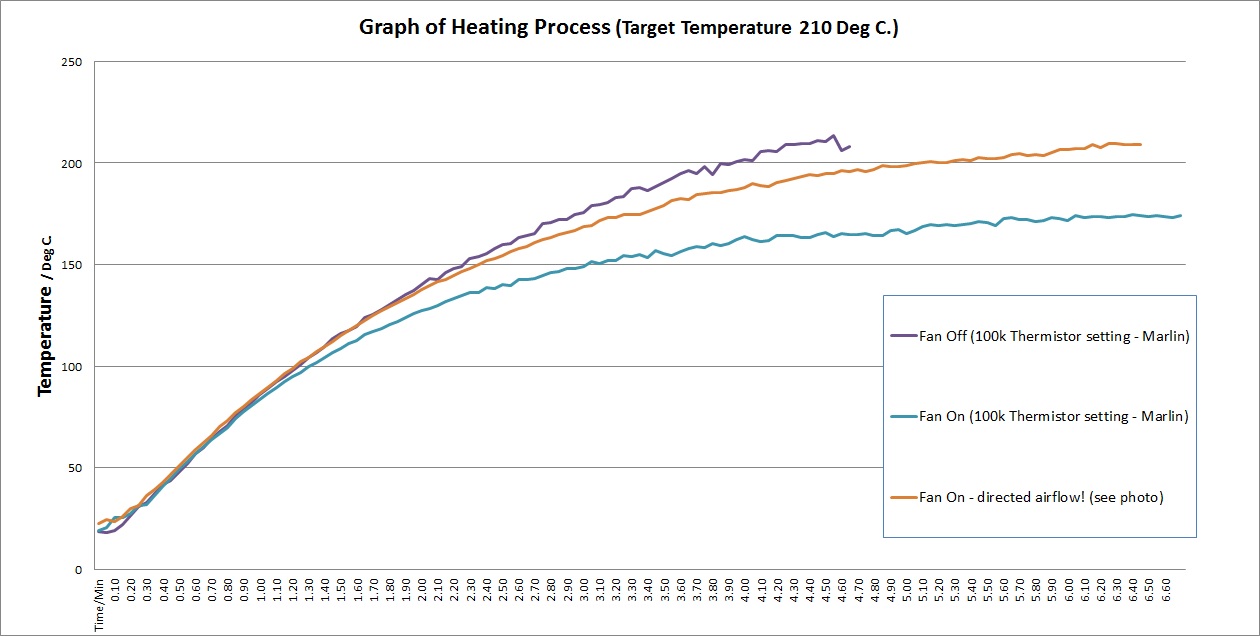
In recent days the outside temperature in these parts have dropped to single digits (Centigrade) and frosty at night. The temperature of the garage, in which I keep the printer, had dropped considerably, and I it seems the very cold filament now takes a higher hot-end temperature to compensate. I've been using a blow heater to bring up the air temperature of the garage in the evenings, but obviously the temperature of the filament spools take longer to adjust. I'm going to run the printer hot-end at a target temperature of 200Deg C (PLA) for now and look long term at better heating for the garage!
So...I got it printing...with some bracing on the Idler.
...and soon had a new Idler printed, and another as a spare.

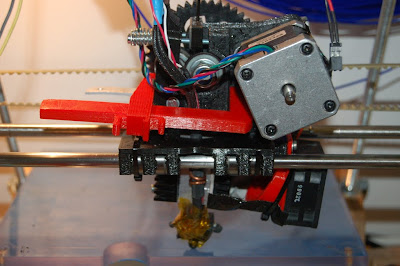
Here's the new one fitted. It's actually a mutch more snug fit, and giving more consistent filament flow. The old one was a bit loose at the hinge.

Finally, you may have noticed the addition of a little 'pull lever' to the top of the Idler. This was easily done in Sketchup, aided greatly by being able to qucikly clean-up imported STL files, using a Sketchup Plug-in called "Cleanup" (tt_cleanup.rb). Taking default settings you can clean up most any imported STL files in an instant. It removes any redundant lines from the model. See screen-shot below showing the imported Idler.stl before and after clean-up and modification. Credit to Greg for the original idler.stl file.

Ok... enought talk... back to printing! :)
Thanks for viewing!

It was one of the first parts I had ever printed, some months ago, and wasn't of great quality really looking at it now, but would have lasted quite well if I hadn't been so impatient with my troubleshooting. But with it now broken I was faced with a dilemma since I hadn't a spare one. How could I print a new one? But in addition, what was the problem with the extruder, as that would have to be solved before any more printing could resume.

But what was wrong with the extruder? With a calmer troubleshooting approach now under way I soon diagnosed that the filament wouldn't feed by hand at all. I took the extruder apart, unscrewing the stainless tube from the brass one and removing the PTFE liner. There were no leaks evident, no blockages aparent. It was a puzzle. I reassembled the hotend and clamped it in a vice, plugged it in and brought it up to 185Deg. The filament would feed smoothly by hand as far as the start of the heater, but no further. With nothing visibly wrong I could only conclude things just weren't hot enough. I increased the temperature in steps of 5Deg C, and things began to flow again. When I reached 200Deg things began to flow smoothly again, with hand fed pressure. I took it to 210Deg and it began to blob and crackle (too hot).
In recent days the outside temperature in these parts have dropped to single digits (Centigrade) and frosty at night. The temperature of the garage, in which I keep the printer, had dropped considerably, and I it seems the very cold filament now takes a higher hot-end temperature to compensate. I've been using a blow heater to bring up the air temperature of the garage in the evenings, but obviously the temperature of the filament spools take longer to adjust. I'm going to run the printer hot-end at a target temperature of 200Deg C (PLA) for now and look long term at better heating for the garage!
So...I got it printing...with some bracing on the Idler.

...and soon had a new Idler printed, and another as a spare.

Here's the new one fitted. It's actually a mutch more snug fit, and giving more consistent filament flow. The old one was a bit loose at the hinge.

Finally, you may have noticed the addition of a little 'pull lever' to the top of the Idler. This was easily done in Sketchup, aided greatly by being able to qucikly clean-up imported STL files, using a Sketchup Plug-in called "Cleanup" (tt_cleanup.rb). Taking default settings you can clean up most any imported STL files in an instant. It removes any redundant lines from the model. See screen-shot below showing the imported Idler.stl before and after clean-up and modification. Credit to Greg for the original idler.stl file.

Ok... enought talk... back to printing! :)
Thanks for viewing!